How to Conduct User Interviews That Drive Product Growth
Great user interviews don’t just happen. They’re the result of a deliberate, structured process that starts long before you ever talk to a user. If you just jump into conversations without a plan, you’ll end up with a collection of interesting anecdotes but no real direction for your product.
Mastering the foundational setup turns random chats into a reliable engine for generating actionable insights. It all boils down to four core phases: defining your goals, recruiting the right participants, creating a flexible discussion guide, and meticulously preparing for the session itself.
Laying the Groundwork for Insightful User Interviews
Before you even think about scheduling a call, you need absolute clarity on what you want to learn. This clarity acts as your compass, guiding every decision that follows—from who you recruit to the specific questions you ask.
This structured approach is precisely why user interviews are so powerful. They remain the most popular qualitative research method for a reason. In fact, 92% of researchers lean on them as a core technique to uncover the “why” behind user actions, a depth that surveys and analytics often miss. (You can dig into more trends in the 2024 State of User Research report).
The Four Pillars of Interview Preparation
To build a solid foundation, you need to focus your energy on four key areas before the first interview is even on the calendar. Each step builds directly on the last, creating a clear path from a vague business question to a truly productive conversation.
This simple workflow breaks down the essential stages for setting up successful user interviews.
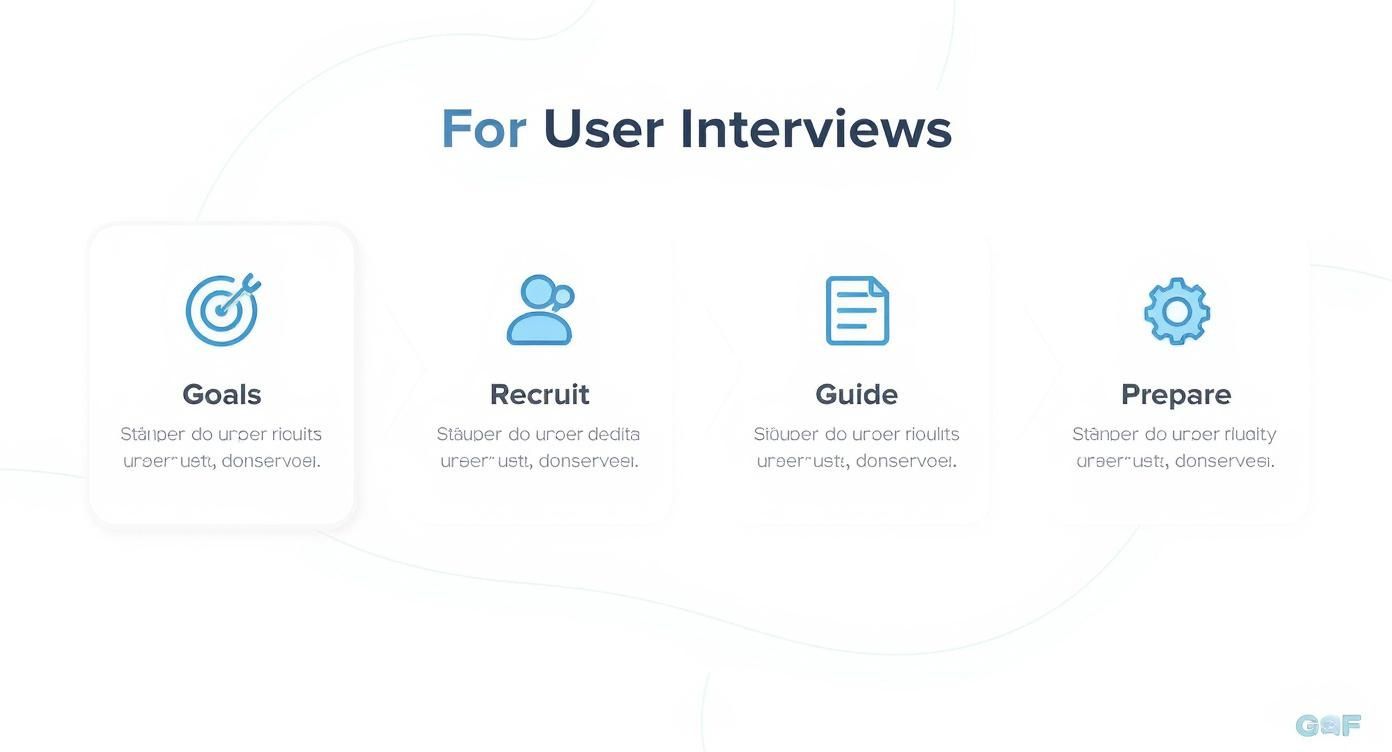
As the diagram shows, it all starts with your goals. Get this first step right, and everything else falls into place much more easily.
-
Define Clear Goals: Start with a specific, answerable question. A vague goal like “improve the product” won’t get you far. Instead, get precise: “Understand why new users drop off during the final step of our onboarding.” A sharp goal makes it dead simple to identify the right participants and write relevant questions.
-
Recruit the Right Participants: Your insights are only as good as the people you talk to. Based on your goal, create a clear profile of your ideal participant. Are you looking for a brand-new user? A power user? Someone who just churned? This focus ensures you’re learning from the people whose problems you’re actually trying to solve.
A well-defined research goal is the foundation of a successful user interview. It transforms a vague curiosity into a focused investigation, ensuring every question you ask contributes directly to actionable insights for your SaaS product.
Thinking through these stages methodically prevents wasted time and guarantees your conversations will be rich with relevant information. This preparation is what separates a friendly chat from a strategic discovery session that drives real product growth.
To give you a quick overview, here’s a look at the entire user interview lifecycle from start to finish. We’ll be diving deep into each of these stages.
The User Interview Lifecycle At-a-Glance
| Stage | Core Objective | Key Tip |
|---|---|---|
| 1. Define Goals | Establish a clear, focused research question to guide the entire process. | Be specific. Instead of “learn about users,” try “identify friction points in the checkout flow.” |
| 2. Recruit Participants | Find and schedule people who perfectly match your target user profile. | Create a simple screener survey to filter for the exact behaviors or demographics you need. |
| 3. Prepare Materials | Develop your interview guide, consent forms, and logistical plan. | Write your questions as prompts, not a script. This encourages a natural conversation. |
| 4. Conduct the Interview | Create a comfortable environment to elicit honest, detailed feedback. | Listen more than you talk. Use silence to encourage the participant to elaborate. |
| 5. Synthesize & Share | Analyze notes to identify patterns and translate them into actionable insights. | Use affinity mapping to group observations and uncover recurring themes across interviews. |
This table provides a high-level roadmap of the journey ahead. Getting comfortable with this lifecycle is the first step toward mastering how to conduct effective user interviews.
Finding the Right People to Talk To
The insights you get from user interviews are only as good as the people you interview. It doesn’t matter how great your questions are—if you talk to the wrong people, you’ll get garbage insights that lead your product in the wrong direction.
The trick is to stop asking broad, fuzzy business questions and start forming sharp, specific research goals. This is what separates a wasted afternoon from a game-changing discovery.
Founders often start with something like, “How can we improve our product?” It’s a good intention, but it’s impossible to act on. You have to get way more specific.
That vague question needs to become something like:
- “What hacks are trial users inventing when our core export feature breaks?”
- “Why are marketing agencies bailing on our Pro plan after exactly three months?”
- “What’s the real motivation for a power user to invite a new teammate?”
See the difference? Each one of those questions points to a very specific person. Nailing this down is the most important thing you’ll do. Get this right, and everything else gets easier.

Where to Find Your Participants
Once you know who you’re looking for, the hunt begins. Where do you actually find these people? For most early-stage SaaS teams, it boils down to two main pools of talent.
Tapping into Your Existing User Base
Your current customers are your most valuable resource. They’re living and breathing your product every day, which means their feedback is grounded in reality. This is your go-to source when you need to understand active users, people who just churned, or your biggest fans.
Here are a few proven ways to reach them:
- In-app messaging: Tools like Intercom or Crisp are perfect for this. You can set up a trigger to catch someone right in the moment—for example, popping up a message for a user who has used a new feature more than five times this week.
- Email lists: Don’t just blast your entire list. Segment it. Create a cohort of users who signed up in the last 30 days but never finished onboarding, or target customers who’ve been with you for over a year.
- Customer support chats: Your support team is sitting on a goldmine. Ask them to flag users who recently ran into a specific problem that matches what you’re trying to learn.
Recruiting from your own user base is cheap and gets you highly relevant people. The only real downside is the risk of bias. Your loyal customers might be too nice, and the angry ones might be… well, too angry.
Talking to your own customers provides invaluable, direct feedback. But if you only rely on them, you risk developing internal bias. You might miss the fresh perspective of someone who has no preconceived notions about your product.
Using Third-Party Recruiting Platforms
Sometimes, you have to look outside your own four walls. This is non-negotiable if you’re exploring a brand new market, testing an idea for a product that doesn’t exist yet, or trying to understand why your competitor’s customers are so loyal.
This is where B2B recruiting platforms come in. They give you access to a huge pool of professionals who meet your exact criteria—job title, industry, company size, you name it. Yes, it costs money, but it saves a ton of time and is the only real way to escape your own echo chamber.
Crafting an Effective Screener Survey
Whether you’re recruiting from your own list or using a platform, you need a screener survey. Think of it as your bouncer. Its only job is to politely turn away anyone who isn’t a perfect fit for your study, saving you from hours of pointless conversations.
A great screener is short, sharp, and sneaky. It identifies the behaviors you’re looking for without telegraphing the “right” answers.
A Simple Screener Framework:
- The Basics: Start simple. “Are you available for a 45-minute recorded video call next week?” Get the logistics out of the way first.
- The Dealbreakers: Ask a broad question to weed out the obvious misfits. If you need project managers, ask a multiple-choice question about their current role with several options. Don’t ask, “Are you a project manager?”
- Behavioral Questions: Focus on recent, concrete actions. Instead of a lazy question like, “Do you collaborate with your team?” ask, “In the last month, which of these tools have you used to manage team projects?”
- The Articulateness Test: Toss in one open-ended question. Something like, “Briefly describe your process for planning a new project.” This tells you if they can actually string a sentence together and provide thoughtful answers.
Keep your screener brutally short—5-7 essential questions max. Anything longer and people will just give up. You’re not trying to run the interview in the screener; you’re just making sure you’ve got the right person in the room.
Crafting a Script That Sparks Real Conversation
Your interview script, often called a discussion guide, is your compass for the conversation. Let’s be clear: this isn’t a rigid set of lines you read word-for-word. Think of it as a structured guide that makes sure you cover your core research questions while leaving plenty of room for the conversation to breathe.
A decent guide keeps you on track. A great one creates space for those unexpected “aha!” moments you can’t plan for. The goal here is to shift from a sterile Q&A into a genuine conversation about your user’s world. You want them to tell you stories. A well-designed script is what gets you there by building trust and digging deeper, step by step.
The Four Acts of an Interview Script
I like to think of every interview guide as a simple, four-act play. Each part has a specific job, moving the participant from being a little nervous and unsure to openly sharing their experiences. Nailing this flow is a game-changer for anyone learning how to conduct user interviews.
-
The Intro (5 minutes): This is all about making them feel comfortable. Start by thanking them for their time, explain why you’re talking today (without giving too much away), and make it crystal clear there are no right or wrong answers. This is also where you handle the consent form. It’s your chance to build immediate rapport.
-
The Warm-Up (5 minutes): Now, ease into the conversation. Ask broad, easy questions about their role, their company, or what a typical day looks like for them. These questions aren’t about your product at all—they’re designed to get the person talking and warm up their storytelling muscles.
-
The Deep Dive (30-40 minutes): This is the main event. Here’s where you unpack the specific topics tied to your research goals. Your questions should all be open-ended, pulling for detailed stories about things they’ve actually done in the past. This is where the gold is buried.
-
The Wrap-Up (5 minutes): Time to land the plane smoothly. Ask if they have any final thoughts or anything they wanted to mention that you didn’t ask about. You’d be surprised how often a crucial insight pops up right at the end. Thank them again, and remind them how they’ll receive their incentive.
Asking Questions That Elicit Stories
The quality of your insights is a direct reflection of the quality of your questions. If you remember only one thing, make it this: ask open-ended questions that prompt stories about past behavior, not opinions about the future.
People are notoriously bad at predicting what they’ll do. Instead of asking, “Would you use a feature that did X?” you’ll get far more reliable information by asking, “Tell me about the last time you tried to accomplish Y.”
This simple switch grounds the entire conversation in reality. Here are some of my go-to prompts for SaaS interviews:
- “Walk me through how you typically start your day.”
- “Tell me about the last time you had to create a report for your team.”
- “Describe a time you felt really frustrated trying to solve [problem].”
- “What was going through your mind when you first signed up for our tool?”
- “Could you show me how you currently handle [specific task]?”
Notice how different these are from questions that shut down the conversation or inject your own bias:
- Leading Question: “Our new dashboard is much easier to use, don’t you think?” (This just pressures them to agree with you.)
- Closed Question: “Do you like our reporting feature?” (This invites a one-word answer: “yes” or “no.”)
Always be ready to follow up with simple probes like “Why was that?” or “Could you tell me more about that?” to dig a layer deeper.
The Importance of Informed Consent
Before you even think about hitting record, you absolutely must get the participant’s informed consent. This isn’t just a legal checkbox; it’s an ethical requirement that forms the foundation of trust for the entire session.
A good consent form is simple, clear, and written in plain English—no jargon. It’s a non-negotiable part of doing this work responsibly.
Your form should clearly state:
- That the session will be recorded (audio and video).
- How the recordings and notes will be used (e.g., for internal product improvement only).
- Who will have access to the data (e.g., your direct product team).
- That their participation is 100% voluntary and they can stop at any time for any reason.
- That their personal information will be kept confidential.
I always start the interview by verbally walking them through these points and asking, “Are you comfortable with me recording this session based on these terms?” Only after getting a clear “yes” do I hit the record button. This simple act of respect sets a positive and professional tone for everything that follows.
The Art of Moderating a User Interview
All your careful preparation comes down to this moment: the live interview. A skilled moderator can turn a simple Q&A into a session that uncovers game-changing insights. Your job isn’t just asking questions; it’s about creating an environment where the participant feels safe enough to share honest, detailed stories.
This requires a mental shift. You aren’t a journalist hunting for a quote or a salesperson pitching a feature. Think of yourself as a curious explorer, genuinely interested in understanding another person’s world. Your best tools are empathy, active listening, and knowing when to stay quiet.

Building Rapport and Trust
Those first five minutes are everything. Your goal is to disarm any nervousness and set the tone that this is a conversation, not a test. A relaxed participant gives much richer feedback.
Start by just being human. Thank them for their time, introduce yourself, and explain the purpose of the chat in neutral terms. Something like, “We’re just trying to learn more about how people in your role handle their daily tasks.”
A simple but powerful technique for building trust is to mirror their language. If they call their team their “squad,” you should too. This subtle move shows you’re paying close attention and creates a sense of shared understanding.
“A great moderator makes the participant feel like the most interesting person in the world. When you listen with genuine curiosity, people open up and share things they wouldn’t in a typical business conversation.”
Asking Powerful Follow-Up Questions
Your script is just a guide. The real magic happens in the follow-ups. These are the simple, powerful probes that peel back the layers of a story. When a participant mentions a specific action or feeling, that’s your cue to dig in.
Don’t be so quick to move on to the next question on your list. Stay in the moment and explore the thread they just gave you.
Here are some of my go-to follow-ups:
- “Why was that important to you?” This gets to their core motivations and values.
- “Tell me more about that.” A simple, open invitation for them to keep talking.
- “What did you expect to happen there?” This reveals their mental model and exposes friction points.
- “How did that make you feel?” This taps into the emotional side of their experience, which is a huge driver of user behavior.
These questions can turn a surface-level comment like “The export feature was confusing” into a rich story about their frustration, the workaround they had to invent, and the impact it had on their deadline. The insights you get from a well-moderated remote user interview can directly shape your product roadmap. For more on this, check out our guide on usability testing and remote user research.
Using Silence as a Tool
This is the hardest technique for new moderators to learn, but it’s one of the most effective. After a participant finishes a thought, resist the urge to immediately jump in with your next question.
Instead, just pause for a few seconds.
This strategic silence gives them space to reflect. More often than not, they’ll fill that silence with something more detailed, thoughtful, or revealing. They might even correct their initial statement or add a crucial piece of context they forgot. It feels awkward at first, but this is where the deepest insights often come from.
Handling Common Interview Challenges
Not every interview is a smooth, easy conversation. Knowing how to navigate the tricky situations is part of the art.
- The Unenthusiastic Participant: If you’re getting short, one-word answers, rephrase your questions to be more experiential. Instead of asking, “Do you like X?” try, “Walk me through the last time you used X.” This nudges them into storytelling mode.
- The Dominating Talker: Some people are just really talkative and can derail the conversation. Gently guide them back by saying something like, “That’s really interesting. I want to make sure we have time to cover a few other areas. Could you tell me about…”
- The Pitcher: Sometimes a participant will try to sell you on their own feature ideas. Acknowledge their input (“Thanks, that’s helpful feedback”) and then pivot back to their past experiences: “To help us understand that better, could you tell me about a time when a feature like that would have been useful?”
Your job is to be a neutral, empathetic guide. By listening more than you talk, asking thoughtful follow-ups, and getting comfortable with silence, you can transform any user interview into a treasure trove of actionable insights.
Choosing Your Tools for Recording and Analysis
The right tech stack can be the difference between a clunky, manual interview process and a smooth, efficient insights machine. Your setup doesn’t need to be complicated or break the bank, but it absolutely must capture conversations reliably and make it easier to find the gold afterward.
Picking the right software is more important than ever. The user research tool market is exploding, projected to jump from roughly USD 245 million to USD 720 million. This isn’t surprising—it’s driven by the massive demand for better digital products and new AI tools that help teams move way faster. You can get the full rundown on the expanding user interview tools market on Strategic Revenue Insights.
This growth means you’ve got more options than ever before, from basic recording apps to powerful, dedicated analysis platforms.
Recording and Transcription Tools
First things first, you need to capture the interview itself. A simple voice memo app can work if you’re in a bind, but you’ll get so much more from tools built for the job, especially for remote sessions.
Your options break down into a few main buckets:
- Standard Video Conferencing: Think Zoom or Google Meet. Everyone knows how to use them, which makes participants comfortable. The big downside? Recording is just step one. You’re on your own for transcription and analysis, which means a lot of manual work.
- Specialized Interview Platforms: Tools like Lookback or UserTesting are designed specifically for this. They bundle recording with features like time-stamped notes and screen sharing, keeping your entire workflow in one place.
- AI-Powered Transcription Services: This is where things get really efficient. Platforms like Grain or Otter.ai can join your calls and create live, speaker-labeled transcripts. This is a game-changer for analysis, letting you search for keywords and create shareable video clips of key moments in seconds.
Tools for Analysis and Synthesis
Recording the conversation is just the beginning. The real magic happens when you turn hours of chatter into clear, actionable insights. This is where analysis tools become your best friend for collaborative sense-making.
Digital whiteboards are the go-to for affinity mapping—the process of clustering individual notes to uncover bigger patterns. They let your whole team jump in and synthesize findings together, no matter where they are.
For example, here’s a team using a digital whiteboard to group user feedback into themes.
This visual way of working makes it dead simple to spot the recurring pain points and opportunities you might otherwise miss in a text document.
Once you start scaling your research, a research repository becomes non-negotiable. This is your central hub for every insight you’ve ever gathered. Tools like Dovetail or EnjoyHQ help you store, tag, and search findings from every single interview.
A research repository is your secret weapon against “insight amnesia.” Instead of research dying in an old slide deck, it becomes a living, searchable asset that informs your product strategy for years. That kind of institutional knowledge is a huge competitive edge.
Nailing your toolset streamlines the entire research process, from capture to conclusion. For a closer look at specific platforms that can level up your workflow, check out our complete guide to customer interview research tools.
Turning Raw Conversations into Actionable Insights
An interview is only valuable if its findings actually lead to something. The real work starts after you hang up the call, turning hours of messy conversation into a clear, strategic direction for your product.
This is where you transform messy notes into sharp, actionable insights.
Right after an interview, while the conversation is still fresh in your mind, spend 10-15 minutes on a quick debrief. Jot down your top takeaways. What surprised you? What was the most impactful quote? This immediate reflection is gold—it prevents the little details from fading away.
From Notes to Patterns with Affinity Mapping
Once you’ve wrapped up a handful of interviews, it’s time to find the patterns. One of the best ways to do this is with affinity mapping. It’s a simple, collaborative way to take individual observations and group them until themes emerge.
Get your team together on a digital whiteboard like Miro or FigJam. Here’s the process:
- Write each distinct observation or powerful quote on its own digital sticky note.
- Work together to drag similar notes into clusters. Don’t overthink it at first.
- Once you have your groups, give each one a name that captures the core theme, like “Frustration with Invoice Management” or “Desire for Better Team Collaboration.”
This visual exercise is powerful because it moves you beyond individual anecdotes to validated patterns. You can literally see which pain points and opportunities pop up most often. It’s a structured approach that’s becoming critical as demand for user research grows—a recent report found 55% of researchers saw an increase in demand over the past year. You can check out the full user research report from Maze.co for more on that trend.
Crafting Compelling Insight Summaries
The goal here isn’t to write a dry, text-heavy report that nobody will read. You need to craft compelling insight summaries that resonate with everyone, from engineers to executives. Frame your findings as opportunities, not just complaints.
A great insight summary combines a clear, data-backed observation with a specific user need and a potential business impact. It answers “what,” “why,” and “so what?” in a single, powerful narrative.
So, instead of saying, “Users are confused by the dashboard,” you reframe it: “New users struggle to find the reporting feature, leading to a 40% drop-off in the first week because they can’t prove immediate value to their managers.”
To make these summaries hit even harder, sprinkle in some illustrative user quotes or, better yet, short video clips of the “aha!” moments from your interviews. That human element is incredibly persuasive.
The final step is connecting these insights directly to your product roadmap. This whole synthesis process ensures you’re building features that solve real, validated user problems. And when you combine these qualitative findings with hard numbers, you get the complete picture. If you want to dive deeper, we have a whole guide on leveraging product usage analytics for deeper insights.
Common User Interview Questions Answered

Even with the best plan in the world, a few practical questions always pop up once you start scheduling and running interviews. We’ve all been there. Here are some straightforward answers to the most common hurdles SaaS teams hit, so you can keep moving forward.
How Many Interviews Are Enough?
The magic number is smaller than you think. You’re not trying to achieve statistical significance like a massive quantitative study. You’re looking for insight saturation.
For most qualitative research, you’ll start hearing the same themes and patterns repeat after just 5 to 8 interviews with a specific customer segment.
That’s your signal. When you can pretty much predict what the next person is going to say, you’ve probably squeezed all the key insights out of that group for now.
How Much Should We Pay Participants?
Let’s be real: you get what you pay for. A fair incentive respects your participant’s time and expertise, and it’s the best way to attract high-quality people who will actually show up and engage.
Here’s a good starting point:
- B2C Users: For general consumers, $60-$100 per hour is a pretty standard and fair rate.
- B2B Professionals: If you’re talking to specialists like doctors, engineers, or executives, you’ll need to bump that up significantly. Expect to pay $150-$300+ per hour.
Keep in mind that for niche B2B roles, the higher rate acknowledges the value of their highly specific knowledge and busy schedules.
What if a User Does Not Show Up?
No-shows happen. It’s just part of the game. The key is to not let it derail your research schedule.
The standard practice is to over-recruit by about 20%. If you need 5 interviews, book 6 or 7. This simple buffer is your best defense against last-minute cancellations and no-shows.
A couple of gentle nudges also go a long way. Send a confirmation email the day before the interview and a quick reminder 15-30 minutes before it starts. This one small step can dramatically cut your no-show rate.
Ready to stop wrestling with DevOps and start interviewing your users? With saasbrella, you get a production-ready SaaS foundation with built-in tools like a waiting list and calendar booking to streamline your research from day one. Explore the complete, AI-ready stack at https://www.saasbrella.co.
Ready to build?
Get Started for Free. Build on a production-ready foundation with authentication, database, and deployment already configured.
No credit card required. Cancel anytime.